
MB-800 · Question #195
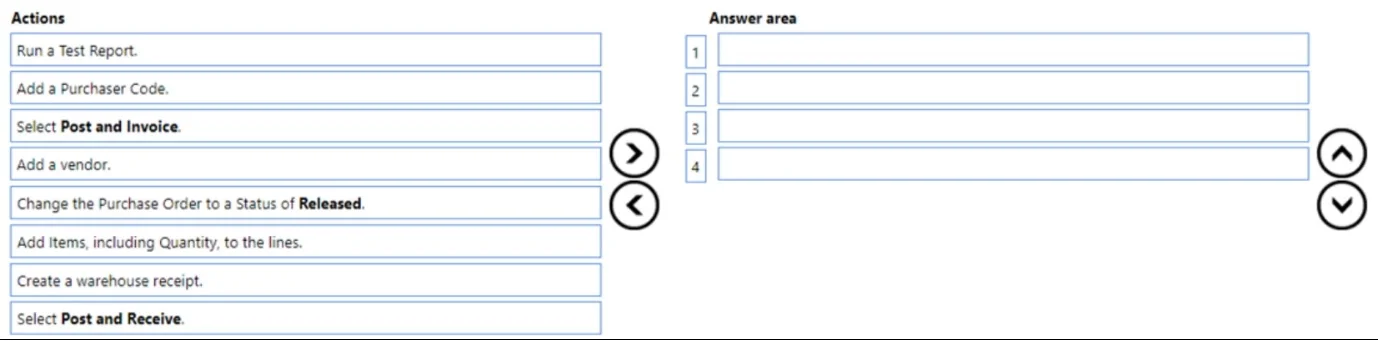
Drag and Drop Question You need to configure the purchase order process for a company. Which four actions should you perform in sequence? To answer, move the appropriate actions from the list of…
The correct answer is Add a Purchase Code.; Add items, including Quantity, to the lines.; Change the Purchase Order to a status of Released.; Select Post and Receive. Purchase Order Process - Drag-and-Drop Explanation This question is from Microsoft Dynamics 365 Business Central and tests knowledge of the standard purchase order workflow. --- The Correct Sequence & Why Step 1: Add a Purchase Code Why first: Before anything else, the PO…
Question
Exhibit
Answer Area
Drag items
Correct arrangement
- Add a Purchase Code.
- Add items, including Quantity, to the lines.
- Change the Purchase Order to a status of Released.
- Select Post and Receive.
Explanation
Purchase Order Process - Drag-and-Drop Explanation
This question is from Microsoft Dynamics 365 Business Central and tests knowledge of the standard purchase order workflow.
The Correct Sequence & Why
Step 1: Add a Purchase Code
Why first: Before anything else, the PO header must be populated with a vendor/purchase code - this identifies who you are buying from. Without this, the document has no context and no lines can be meaningfully added.
Common mistake: Choosing "Add a vendor" here. "Add a vendor" means creating a new vendor master record in the system - a setup task done before the PO process, not during it. "Add a Purchase Code" is the act of selecting an existing vendor on the PO header.
Step 2: Add items, including Quantity, to the lines
Why second: Once the header identifies the vendor, you populate the purchase lines - specifying which items you are ordering and in what quantity. This defines the obligation of the order.
Common mistake: Skipping quantity. Quantity is required for the system to calculate expected receipts and costs. A line without a quantity is incomplete.
Step 3: Change the Purchase Order to a status of Released
Why third: Releasing the PO is an approval/authorization step. It signals the order is finalized and ready for warehouse/receiving operations. Business Central requires Released status before the order can be posted or received against.
Common mistake: Skipping this step entirely. Some assume you can post directly from an open PO. You cannot - the Released status is a required gate.
Step 4: Select Post and Receive
Why fourth: This posts the physical receipt of goods into inventory, creating item ledger entries and a posted purchase receipt document. It is the logical conclusion of the receiving workflow.
Common mistake: Choosing "Select Post and Invoice" here. Post and Invoice processes the vendor's financial invoice - it comes after receiving, not in place of it. Invoicing before confirming receipt is incorrect sequencing.
Why the Other Items Are Excluded
| Item | Why excluded |
|---|---|
| Run a Test Report | Optional pre-posting check; not a required step in the standard flow |
| Add a vendor | Vendor master setup, done before PO creation - not part of the PO process itself |
| Select Post and Invoice | Comes after receiving; a separate financial step |
| Create a warehouse receipt | Only applies in advanced warehouse configurations; basic setups use Post and Receive directly |
Mental Model
Think of it as: Who → What → Approve → Receive. The PO process moves from identification, to detail, to authorization, to physical action - in that order.
Topics
Community Discussion
No community discussion yet for this question.