nerdexam
Microsoft

MB-230 · Question #28

Drag and Drop Question You are a Dynamics 365 for Customer Service administrator. Your company provides support between 9 a.m. and 5 p.m. You must add a warning to account records when service represe

The correct answer is Customize the accounts entity to enable SLAs. Add a status reason for unverified accounts. Set the value for the status reason to Verified.; Publish the account customizations. Set the business hours for the support department.; Create an enhanced SLA on the account that tracks when the status reason changes to Verified.; Configure the SLA details and set a warning at six hours and a failure at eight hours.. Dynamics 365 SLA Setup Order - Explained This question tests your understanding of the dependency chain required to configure SLAs in Dynamics 365 Customer Service. Each step must complete before the next is possible. --- The Core Logic: Why This Order? SLA configuration follows

manage entitlements and SLAs

Question

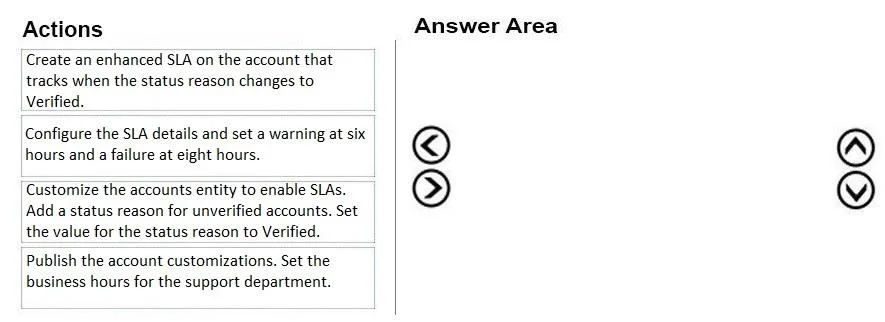
Drag and Drop Question You are a Dynamics 365 for Customer Service administrator. Your company provides support between 9 a.m. and 5 p.m. You must add a warning to account records when service representatives do not contact an account within eight business hours of the account being verified. You need to enable service-level agreements (SLAs) for accounts. In which order should you perform the actions? To answer, move all actions from the list to the answer area and arrange them in the correct order. Answer:

Exhibit
MB-230 question #28 exhibit

Answer Area

Drag items

Create an enhanced SLA on the account that tracks when the status reason changes to Verified.Configure the SLA details and set a warning at six hours and a failure at eight hours.Customize the accounts entity to enable SLAs. Add a status reason for unverified accounts. Set the value for the status reason to Verified.Publish the account customizations. Set the business hours for the support department.

Correct arrangement

  • Customize the accounts entity to enable SLAs. Add a status reason for unverified accounts. Set the value for the status reason to Verified.
  • Publish the account customizations. Set the business hours for the support department.
  • Create an enhanced SLA on the account that tracks when the status reason changes to Verified.
  • Configure the SLA details and set a warning at six hours and a failure at eight hours.

Explanation

Dynamics 365 SLA Setup Order - Explained

This question tests your understanding of the dependency chain required to configure SLAs in Dynamics 365 Customer Service. Each step must complete before the next is possible.


The Core Logic: Why This Order?

SLA configuration follows a strict prerequisite chain: entity setup → publish → SLA creation → SLA detail configuration. You can't configure what doesn't exist yet.


Step-by-Step Breakdown

Step 1: Customize the accounts entity to enable SLAs. Add a status reason for unverified accounts. Set the value for the status reason to Verified.

  • Why first: SLAs in Dynamics 365 can only be applied to entities that have SLA tracking explicitly enabled. The Account entity does not have this on by default.
  • The SLA trigger in this scenario is a status reason change to "Verified" - so that custom status reason must exist in the system before you can reference it in an SLA rule.
  • Common mistake: Skipping entity customization and trying to create the SLA directly - the Account entity won't appear as an SLA-eligible entity, and "Verified" won't exist as a trigger value.

Step 2: Publish the account customizations. Set the business hours for the support department.

  • Why second: Customizations in Dynamics 365 are not live until published. Unpublished changes are invisible to the SLA engine.
  • Business hours (9 a.m.–5 p.m.) must also be defined before the SLA is created, because the SLA references a business hours schedule directly. You cannot attach a schedule that doesn't exist yet.
  • Common mistake: Creating the SLA before publishing, or forgetting business hours entirely and wondering why the 8-hour timer counts clock hours instead of business hours.

Step 3: Create an enhanced SLA on the account that tracks when the status reason changes to Verified.

  • Why third: Now that the entity is SLA-enabled, the custom status reason exists and is published, and business hours are defined - you can create the SLA record itself.
  • You must choose Enhanced SLA (not standard) because enhanced SLAs support warning thresholds, which are required here.
  • The SLA is configured to trigger on the "Verified" status reason change established in Step 1.
  • Common mistake: Using a standard SLA instead of an enhanced SLA - standard SLAs do not support warning actions, so the warning requirement cannot be met.

Step 4: Configure the SLA details and set a warning at six hours and a failure at eight hours.

  • Why last: SLA Details (the KPI items with warning/failure times) are child records of the SLA. The parent SLA record must exist before you can create its detail items.
  • Warning at 6 hours (not 8) is intentional - it gives representatives a 2-hour buffer before the 8-hour failure threshold is breached. The question asks for a warning, not the failure point.
  • Common mistake: Setting warning and failure both at 8 hours, or setting the warning at 8 hours and failure later - the warning must precede the failure threshold.

Summary Table

StepActionWhy It Must Be Here
1Enable SLA on entity + add "Verified" statusCreates the prerequisites the SLA needs to reference
2Publish + set business hoursMakes customizations live; provides the schedule for the SLA
3Create enhanced SLARequires entity to be ready and business hours to exist
4Configure SLA details (warning/failure)Requires the parent SLA record to exist first

Topics

#SLA configuration#business hours#account entity customization#SLA warning threshold

Community Discussion

No community discussion yet for this question.

Full MB-230 Practice