MB-800 · Question #150
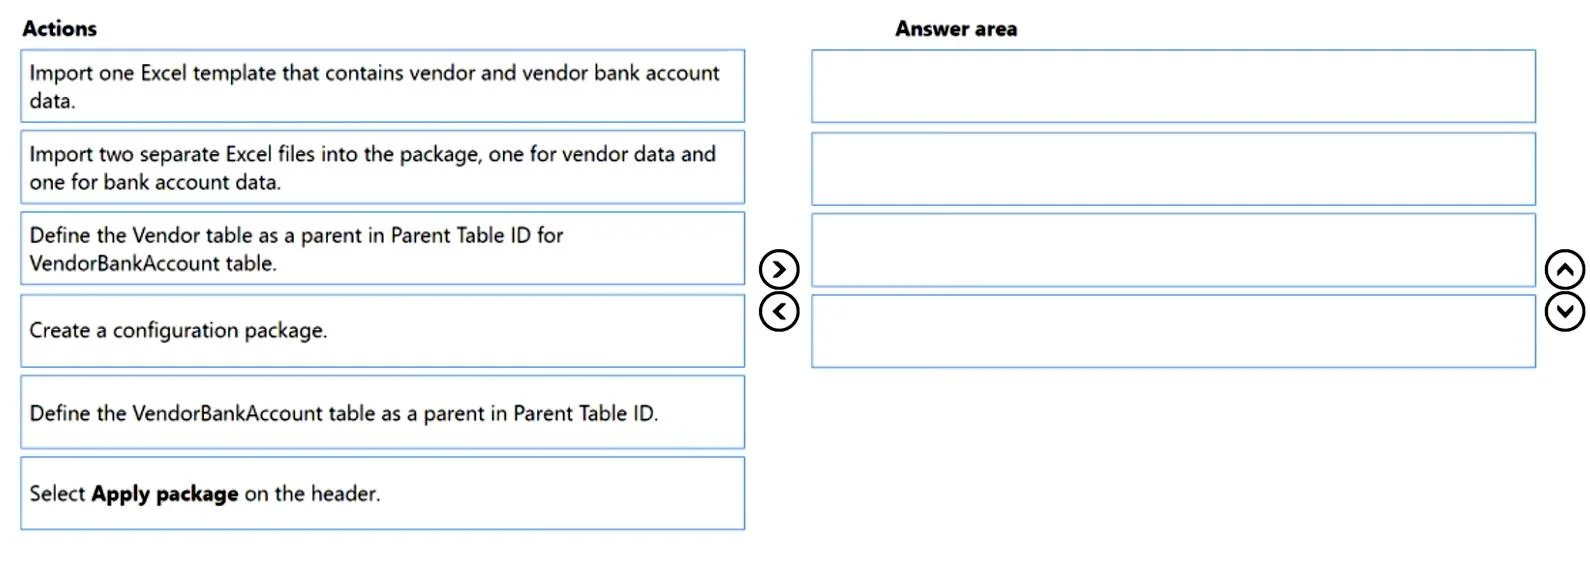
Drag and Drop Question You set up a new company for a client. The client provides you with a Microsoft Excel file that contains master data for vendors and vendor bank accounts details. You need to…
The correct answer is Create a configuration package.; Define the Vendor table as a parent in Parent Table ID for vendorBankAccounts.; Import one Excel template that contains vendor and vendor bank account data.; Select Apply package on the header. Explanation: Importing Vendor & Bank Account Data via Configuration Package (Business Central) This question tests knowledge of the Configuration Package workflow in Microsoft Dynamics 365 Business Central. --- Why This Order? Configuration packages follow a strict setup →…
Question
Exhibit
Answer Area
Drag items
Correct arrangement
- Create a configuration package.
- Define the Vendor table as a parent in Parent Table ID for vendorBankAccounts.
- Import one Excel template that contains vendor and vendor bank account data.
- Select Apply package on the header.
Explanation
Explanation: Importing Vendor & Bank Account Data via Configuration Package (Business Central)
This question tests knowledge of the Configuration Package workflow in Microsoft Dynamics 365 Business Central.
Why This Order?
Configuration packages follow a strict setup → configure → import → apply sequence. You cannot apply what doesn't exist, and you cannot import without a defined structure.
Step-by-Step Breakdown
1. Create a configuration package.
You must create the package first - it's the container that holds all table definitions and imported data. Nothing else can happen without it. This is always step one; there is no package to configure or import into otherwise.
2. Define the Vendor table as a parent in Parent Table ID for VendorBankAccounts.
Vendor Bank Accounts (Table 288) are child records that belong to a Vendor (Table 23). By setting the Parent Table ID on the VendorBankAccount table to point to Vendor, you tell BC that these two tables are related. This is critical because:
- It allows both tables to be exported into a single Excel template with a parent-child sheet structure.
- It ensures referential integrity - bank accounts are linked to the correct vendor on import.
- This must happen before generating/importing the template, because the relationship drives how the Excel file is structured.
Common mistake: Candidates confuse which table gets the Parent Table ID entry. It is the child table (VendorBankAccount) that references the parent (Vendor), not the other way around.
3. Import one Excel template that contains vendor and vendor bank account data.
Once the parent-child relationship is defined, BC can export a single Excel template with two sheets (one per table). The client fills this in, and you import it back. The correct choice here is one file - not two separate files - because the parent-child configuration enables a unified template. Importing two separate files is the wrong distractor and would break the relational link.
Common mistake: Choosing "Import two separate Excel files." While technically possible in some workflows, it defeats the purpose of defining the parent-child relationship and is not the correct approach here.
4. Select Apply package on the header.
Importing data populates a staging area inside the package - it does not immediately push records into BC tables. You must explicitly click Apply Package to validate and migrate the staged data into the live Vendor and VendorBankAccount tables. This is always the final step.
Common mistake: Assuming import = apply. The two-stage design (import → apply) exists so you can review and correct data before it hits the live database.
Rejected Items - Why They're Wrong
| Item | Why Excluded |
|---|---|
| Import two separate Excel files | Contradicts the parent-child setup; one template handles both tables |
| Define VendorBankAccount table as a parent | Backwards - VendorBankAccount is the child, not the parent |
Topics
Community Discussion
No community discussion yet for this question.