
MB-500 · Question #323
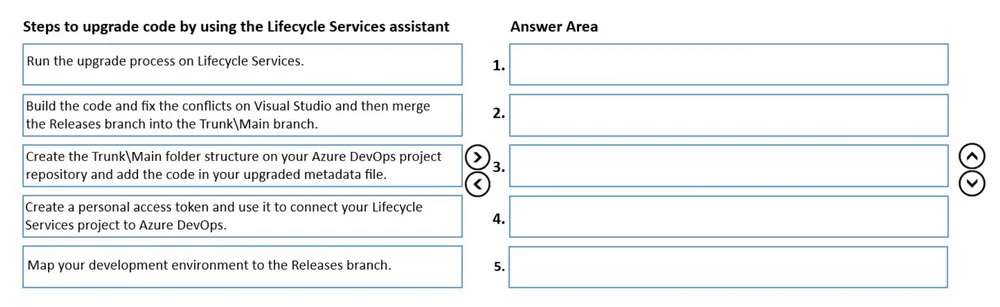
Drag and Drop Question A company is upgrading from Dynamics AX 2012 to Dynamics 365 Finance. The company converts its existing Dynamics AX 2012 model store to the upgraded metadata file. The company…
The correct answer is Create the Trunk/Main folder structure on your Azure DevOps project repository and add the code in your upgraded metadata file.; Create a personal access token and use it to connect your Lifecycle Services project to Azure DevOps.; Run the upgrade process on Lifecycle Services.; Map your development environment to the Releases branch.; Build the code and fix the conflicts on Visual Studio and then merge the Releases branch into the Trunk/Main branch. Dynamics AX 2012 → Dynamics 365 Finance: Code Upgrade Process Context This upgrade involves three systems working together: Azure DevOps (source control), Lifecycle Services/LCS (Microsoft's cloud platform for D365 operations), and Visual Studio (local development). The order…
Question
Exhibit
Answer Area
Drag items
Correct arrangement
- Create the Trunk/Main folder structure on your Azure DevOps project repository and add the code in your upgraded metadata file.
- Create a personal access token and use it to connect your Lifecycle Services project to Azure DevOps.
- Run the upgrade process on Lifecycle Services.
- Map your development environment to the Releases branch.
- Build the code and fix the conflicts on Visual Studio and then merge the Releases branch into the Trunk/Main branch.
Explanation
Dynamics AX 2012 → Dynamics 365 Finance: Code Upgrade Process
Context
This upgrade involves three systems working together: Azure DevOps (source control), Lifecycle Services/LCS (Microsoft's cloud platform for D365 operations), and Visual Studio (local development). The order follows a strict dependency chain: you must have infrastructure before you can connect to it, and connection before you can use it.
Step-by-Step Breakdown
Step 1: Create the Trunk/Main folder structure on Azure DevOps and add the upgraded metadata file
This is the mandatory foundation. Trunk/Main is your stable, authoritative branch. You've already converted the AX 2012 model store into upgraded metadata - now it needs a home in source control. Nothing else can proceed without a repository structure in place. LCS can't connect to something that doesn't exist.
Step 2: Create a personal access token and connect LCS to Azure DevOps
LCS needs authenticated access to Azure DevOps to perform the upgrade. The PAT is the credential that establishes this trust. This step comes before running the LCS upgrade because the upgrade process itself pushes output into Azure DevOps - it needs the connection first. You cannot run Step 3 without this link.
Step 3: Run the upgrade process on Lifecycle Services
Now that LCS is connected to your repo, it performs the actual code upgrade analysis. It applies upgrade transformation rules to your codebase and creates a Releases branch in Azure DevOps, populated with the upgraded code and conflict markers. This is the step that produces the raw upgraded output you'll work with next.
Step 4: Map your development environment to the Releases branch
The Releases branch (created by LCS in Step 3) is where conflicts live - it is not clean yet. You map your local Visual Studio workspace to this branch, not Trunk/Main, because you need to work on the conflicted code locally. Mapping to Trunk/Main here would be wrong - it's still the pre-fix codebase at this point.
Step 5: Build the code, fix conflicts in Visual Studio, then merge Releases into Trunk/Main
With your environment pointed at Releases, you can compile, discover build errors and conflicts, and resolve them. Only after the code builds cleanly do you merge Releases → Trunk/Main. This promotes the now-clean upgraded code into the stable branch. This must be last - merging before fixing conflicts would corrupt Trunk/Main.
Common Mistakes
| Mistake | Why It Fails |
|---|---|
| Connecting LCS before creating the Azure DevOps repo structure | Nothing to connect to yet |
| Running the LCS upgrade before creating the PAT/connection | LCS has no Azure DevOps access |
| Mapping VS to Trunk/Main instead of Releases | Conflicts are in Releases; you'd be editing the wrong branch |
| Merging before building/fixing | Pushes broken, conflicted code into the stable branch |
Why "More Than One Order Is Correct"
Steps 1 and 2 can technically be swapped - you can create a PAT before or after setting up the Azure DevOps folder structure, since neither depends on the other. Both just need to be complete before Step 3. The exam acknowledges this flexibility.
Topics
Community Discussion
No community discussion yet for this question.