
300-440 · Question #29
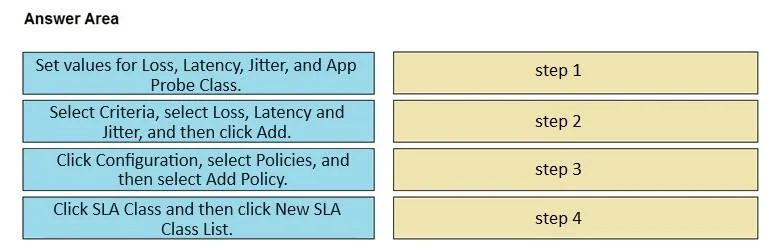
Drag and Drop Question An engineer must use Cisco vManage to configure an SLA class to specify the maximum packet loss, packet latency, and jitter allowed on a connection. Drag and drop the steps…
The correct answer is Click Configuration, select Policies, and then select Add Policy.; Click SLA Class and then click New SLA Class List.; Select Criteria, select Loss, Latency and Jitter, and then click Add.; Set values for Loss, Latency, Jitter, and App Probe Class. Cisco vManage SLA Class Configuration - Step-by-Step Explanation Why This Order? The sequence follows a strict navigate → create → configure → define workflow. Each step depends on the previous one being complete before it appears or is actionable in the UI. --- Step-by-Step…
Question
Exhibit
Answer Area
Drag items
Correct arrangement
- Click Configuration, select Policies, and then select Add Policy.
- Click SLA Class and then click New SLA Class List.
- Select Criteria, select Loss, Latency and Jitter, and then click Add.
- Set values for Loss, Latency, Jitter, and App Probe Class.
Explanation
Cisco vManage SLA Class Configuration - Step-by-Step Explanation
Why This Order?
The sequence follows a strict navigate → create → configure → define workflow. Each step depends on the previous one being complete before it appears or is actionable in the UI.
Step-by-Step Breakdown
Step 1: Click Configuration, select Policies, and then select Add Policy.
This is the mandatory entry point. SLA Classes live inside the Policy framework in vManage. You cannot access any policy-related list (including SLA Class) without first navigating to Configuration > Policies and initiating a new policy with Add Policy. Skipping this step means the SLA Class menu is never reached.
Common mistake: Thinking SLA Class is a standalone menu. It is not - it is nested within the policy creation workflow.
Step 2: Click SLA Class and then click New SLA Class List.
Once inside the policy wizard, you must explicitly navigate to the SLA Class section and create a new list container before you can define any criteria. "New SLA Class List" is what allocates the named object you will populate. You are not yet setting values - you are creating the object that will hold them.
Common mistake: Trying to set Loss/Latency/Jitter values before the SLA Class list object exists. The value fields are not available until the list is created.
Step 3: Select Criteria, select Loss, Latency and Jitter, and then click Add.
After the list is created, you choose which metrics the SLA class will evaluate. The Criteria selector lets you pick from Loss, Latency, Jitter (and combinations). Clicking Add commits those selections and dynamically reveals the corresponding value fields. This step must come before Step 4 because the input fields for thresholds only appear after criteria are selected.
Common mistake: Assuming all value fields are visible by default. Only after selecting and adding criteria does vManage display the fields to input specific threshold numbers.
Step 4: Set values for Loss, Latency, Jitter, and App Probe Class.
Only now - with the list created and criteria selected - are the threshold fields available. Here you enter the actual numeric limits (e.g., max 1% loss, max 150ms latency, max 30ms jitter) and optionally associate an App Probe Class (used for active SLA monitoring with BFD probes). This is the final configuration step that completes the SLA class definition.
Common mistake: Forgetting to configure the App Probe Class field. It is required if you want vManage to actively monitor path quality against this SLA - without it, the SLA class cannot be used for real-time path selection enforcement.
Summary Table
| Step | Action | Why Here |
|---|---|---|
| 1 | Navigate to Configuration > Policies > Add Policy | Gateway to all policy objects |
| 2 | SLA Class > New SLA Class List | Creates the container object |
| 3 | Select Criteria + Add | Determines which metrics are tracked; unlocks value fields |
| 4 | Set threshold values + App Probe Class | Populates the now-visible fields with actual limits |
The core principle: vManage uses a wizard-driven UI where each step gates the next. The ordering is not arbitrary - it mirrors the literal sequence of UI elements becoming available.
Topics
Community Discussion
No community discussion yet for this question.