MB-280 · Question #68
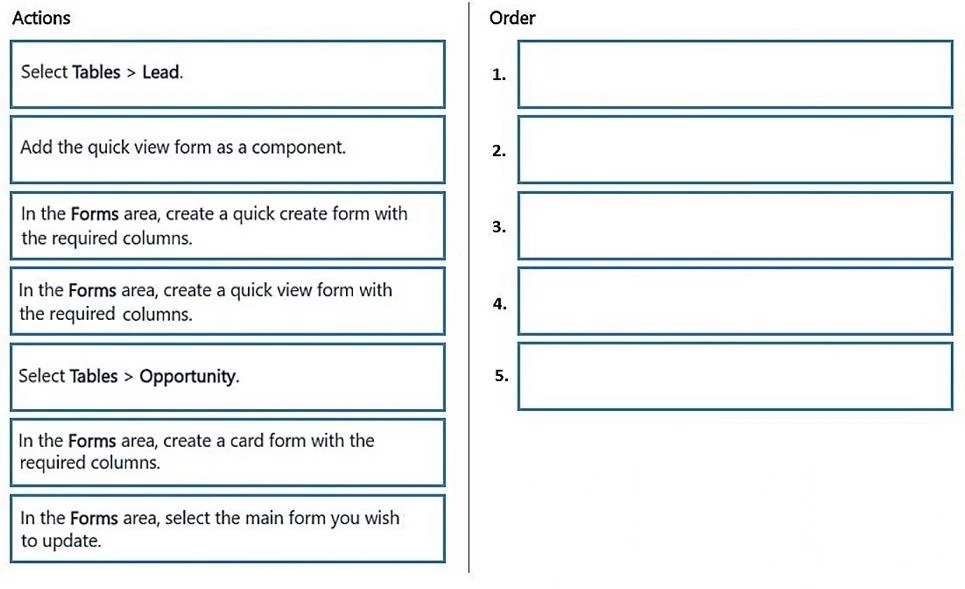
Drag and Drop Question You are designing the user experience for sales users at your organization for a variety of tasks. One of the user experience requirements is for sales users to be able to see i
The correct answer is Select Tables > Lead.; In the Forms area, create a quick view form with the required columns.; Select Tables > Opportunity.; In the Forms area, select the main form you wish to update.; Add the quick view form as a component.. Dynamics 365: Quick View Form for Lead Data on Opportunity Core Concept The solution uses a Quick View Form - a special form type in Dynamics 365 that displays read-only fields from a related record directly on another record's form. Since Opportunity has a built-in "Originating
Question
Exhibit
Answer Area
Drag items
Correct arrangement
- Select Tables > Lead.
- In the Forms area, create a quick view form with the required columns.
- Select Tables > Opportunity.
- In the Forms area, select the main form you wish to update.
- Add the quick view form as a component.
Explanation
Dynamics 365: Quick View Form for Lead Data on Opportunity
Core Concept
The solution uses a Quick View Form - a special form type in Dynamics 365 that displays read-only fields from a related record directly on another record's form. Since Opportunity has a built-in "Originating Lead" lookup relationship to Lead, you can create a Quick View Form on Lead and embed it into the Opportunity main form. Sales users then see Lead custom attributes without ever leaving the Opportunity.
Step-by-Step Breakdown
Step 1 - Select Tables > Lead
You start on the Lead table because the Quick View Form must be defined on the source table - the one whose data you want to display. The form artifact "lives" in Lead's Forms area. Navigating to Opportunity first would be wrong; there's nothing to build there yet.
Step 2 - In the Forms area, create a quick view form with the required columns
On the Lead table, you create a Quick View Form (not Quick Create, not Card) and add the custom Lead attribute columns to it. This form type is specifically designed for read-only display of related record data on a host form. The other distractors exist for different purposes:
- Quick Create form → rapid data entry in a slide-out panel
- Card form → compact display in views/dashboards
The Quick View Form must exist before you can reference it elsewhere.
Step 3 - Select Tables > Opportunity
Now you switch to the destination table. Sales users work on Opportunity records, so the Opportunity main form is where the Quick View Form will be embedded. You cannot skip to this step earlier because the component you need to add (the Lead Quick View Form) didn't exist yet.
Step 4 - In the Forms area, select the main form you wish to update
You open the specific Opportunity main form that sales users see. Main forms are the primary interaction surface; only main forms support Quick View Form components. You must be inside the form editor before you can add components to it.
Step 5 - Add the quick view form as a component
Inside the Opportunity main form editor, you insert the Lead Quick View Form as a component. Dynamics 365 resolves the link through the "Originating Lead" lookup field on the Opportunity. At runtime, it reads the related Lead record and renders the Quick View Form's fields inline.
Common Mistakes & Misconceptions
| Mistake | Why It's Wrong |
|---|---|
| Choosing Quick Create form | Quick Create is for fast data entry, not display on another record |
| Choosing Card form | Card forms are for views/dashboards, not embedded on main forms |
| Creating the form on Opportunity instead of Lead | The Quick View Form must be defined on the related table (Lead), not the host table |
| Adding the component before creating the Quick View Form | The component picker won't have a form to select if it doesn't exist yet |
| Skipping "select the main form" and trying to add the component from the table level | You must be inside the form editor to insert components |
Why the Order Has Flexibility
The exam notes "more than one correct order" - specifically, steps 1→2 (Lead setup) must precede steps 3→4→5 (Opportunity setup), but within each group the sub-steps are fixed. The constraint is logical dependency: create the source form before referencing it in the destination form.
Topics
Community Discussion
No community discussion yet for this question.