
MB-280 · Question #122
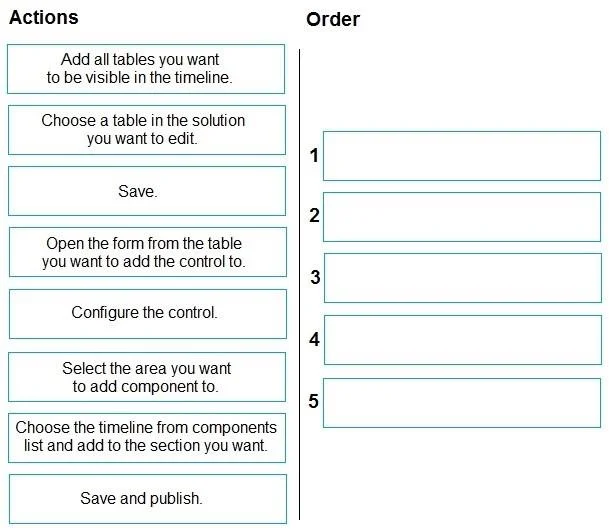
Drag and Drop Question The sales team wants to see a timeline of related activities and notes on a custom Dynamics 365 Sales form. You need to add a timeline control to the form, Which five actions…
The correct answer is Add all tables you want to be visible in the timeline.; Open the form from the table you want to add the control to.; Choose the timeline from components list and add to the section you want.; Configure the control.; Save and publish. Adding a Timeline Control to a Dynamics 365 Sales Form Overview The timeline control displays a chronological view of activities (emails, calls, tasks) and notes related to a record. Adding it requires navigating Power Apps / Dynamics 365 customization in a specific order…
Question
Exhibit
Answer Area
Drag items
Correct arrangement
- Add all tables you want to be visible in the timeline.
- Open the form from the table you want to add the control to.
- Choose the timeline from components list and add to the section you want.
- Configure the control.
- Save and publish.
Explanation
Adding a Timeline Control to a Dynamics 365 Sales Form
Overview
The timeline control displays a chronological view of activities (emails, calls, tasks) and notes related to a record. Adding it requires navigating Power Apps / Dynamics 365 customization in a specific order.
Step-by-Step Breakdown
1. Add all tables you want to be visible in the timeline.
Before touching any form, you must configure which tables (Activities, Notes, etc.) the timeline will surface. This is done at the environment/solution configuration level - it's a prerequisite that determines what data the control can even reference later. Skipping this first means you'd configure a control with no data sources defined.
Common mistake: People try to configure this after adding the control to the form, then wonder why certain activity types don't appear.
2. Open the form from the table you want to add the control to.
Once the data sources are set, you navigate to the specific table (e.g., Account, Contact, or your custom table) and open the target form in the form editor. You must be inside the form editor before you can place any component.
Common mistake: Choosing "Choose a table in the solution you want to edit" (a distractor) sounds similar, but opening the form specifically is the required action - just selecting the table is not enough.
3. Choose the timeline from the components list and add it to the section you want.
With the form editor open, you add the timeline component from the component library into a section of the form layout. You must place it before you can configure it - you can't configure what isn't on the form yet.
Common mistake: Trying to configure before placing, or selecting the wrong section (timeline typically needs a full-width column section).
4. Configure the control.
After the timeline is placed on the form, you configure its properties - which activities to show, sort order, filter defaults, etc. Configuration only makes sense after placement because you're editing the properties of the instance on this specific form.
Common mistake: Conflating step 1 (table-level visibility) with step 4 (form-level control configuration). They're different layers of the same feature.
5. Save and publish.
Always the final step. "Save" alone (a distractor) persists your changes in draft but doesn't deploy them to users. "Save and publish" commits the form changes and makes them live. Publishing without saving first is not possible, so this is a single atomic final action.
Common mistake: Choosing plain "Save" as the last step - changes won't be visible to end users until published.
Why the Distractors Were Excluded
| Distractor | Why excluded |
|---|---|
| Choose a table in the solution you want to edit | Too vague - you specifically need to open the form, not just select the table |
| Select the area you want to add component to | This is implicit within step 3 (you pick a section when adding the component); it's not a discrete standalone step |
| Save (without publish) | Incomplete - changes must be published to be visible to users |
Mental Model
Think of it as: configure data sources → open the canvas → place the widget → tune its settings → ship it. Each step is a prerequisite gate for the next.
Topics
Community Discussion
No community discussion yet for this question.