
MB-280 · Question #124
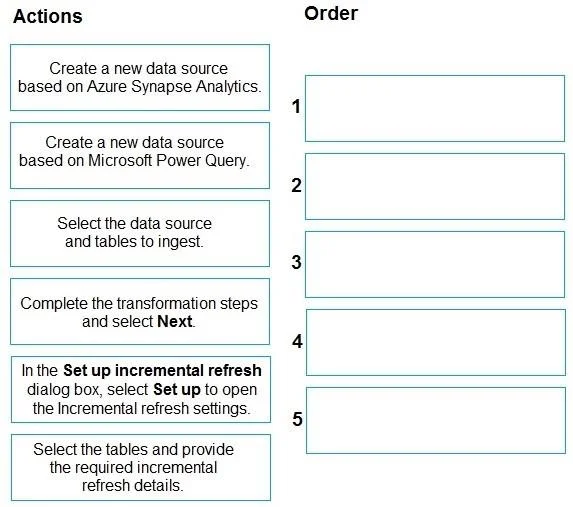
Drag and Drop Question Your organization introduced a new loyalty solution that exposes the loyalty profile and related point transactions in an Azure SQL Database. You need to ensure the new…
The correct answer is Create a new data source based on Microsoft Power Query.; Select the data source and tables to ingest.; Complete the transformation steps and select Next.; In the Set up incremental refresh dialog box, select Set up to open the incremental refresh settings.; Select the tables and provide the required incremental refresh details. Explanation: Importing Azure SQL Data into Dynamics 365 Customer Insights - Data Why Azure Synapse Analytics is the Distractor The source is Azure SQL Database - not Azure Synapse Analytics. Customer Insights - Data connects to Azure SQL Database via Microsoft Power Query, not…
Question
Exhibit
Answer Area
Drag items
Correct arrangement
- Create a new data source based on Microsoft Power Query.
- Select the data source and tables to ingest.
- Complete the transformation steps and select Next.
- In the Set up incremental refresh dialog box, select Set up to open the incremental refresh settings.
- Select the tables and provide the required incremental refresh details.
Explanation
Explanation: Importing Azure SQL Data into Dynamics 365 Customer Insights - Data
Why Azure Synapse Analytics is the Distractor
The source is Azure SQL Database - not Azure Synapse Analytics. Customer Insights - Data connects to Azure SQL Database via Microsoft Power Query, not through Synapse. This is the primary trap in the question. Synapse is a separate analytics service; confusing the two is the most common mistake candidates make.
Step-by-Step Breakdown
Step 1 - Create a new data source based on Microsoft Power Query
Power Query is the correct connector for Azure SQL Database in Customer Insights - Data. You initiate the entire ingestion flow here. You cannot select tables, transform, or configure refresh until the data source type is established. This must come first.
Step 2 - Select the data source and tables to ingest
After choosing Power Query, you authenticate and connect to the Azure SQL Database, then choose which tables to bring in. You need a connection before you can pick tables - this step cannot precede Step 1.
Step 3 - Complete the transformation steps and select Next
Power Query opens an editor where you can filter columns, rename fields, or apply other shaping logic. You must finish transformations before the wizard moves you to the refresh configuration screen. Skipping or reordering this would leave the data pipeline incomplete before refresh settings appear.
Step 4 - In the Set up incremental refresh dialog box, select Set up
After transformations, Customer Insights - Data presents the incremental refresh dialog. You must explicitly open the incremental refresh settings here - it does not configure itself. This step is the entry point to the refresh configuration, so it must precede the actual table-level configuration.
Step 5 - Select the tables and provide the required incremental refresh details
Finally, you specify which tables support incremental refresh and supply details like the date/time column used to detect new or changed rows. This is the final configuration before hitting Save - you cannot provide table-level refresh details until you've opened the settings in Step 4.
Common Mistakes
| Mistake | Why It's Wrong |
|---|---|
| Choosing Azure Synapse Analytics | Azure SQL Database → Power Query, not Synapse |
| Placing incremental refresh config before transformations | The wizard enforces transformation completion first |
| Skipping Step 4 and going straight to table details | Step 4 is the required "open settings" gate that unlocks Step 5 |
Key Concept
The workflow is linear and wizard-driven: source type → connection/tables → transform → refresh entry → refresh details → Save. Each step unlocks the next; none can be reordered without breaking the flow.
Topics
Community Discussion
No community discussion yet for this question.