MB-280 · Question #121
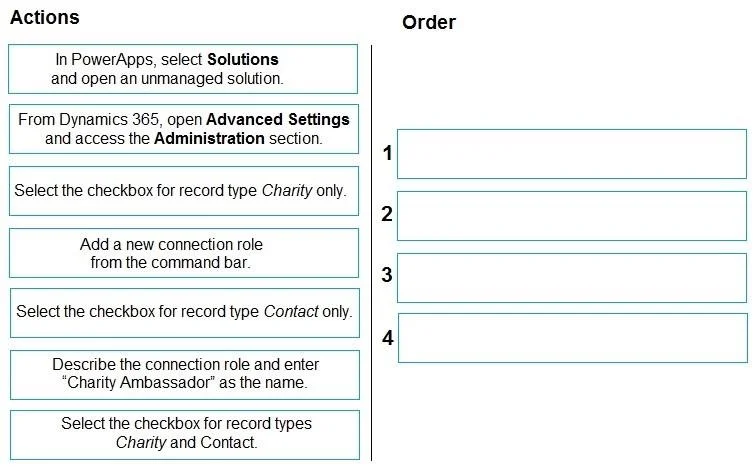
Drag and Drop Question Within your non-profit organization you have set up your different charities in a custom table to store charity records. In the Contact table, you have various famous people who
The correct answer is In PowerApps, select Solutions and open an unmanaged solution.; Add a new connection role from the command bar.; Describe the connection role and enter "Charity Ambassador" as the name.; Select the checkbox for record types Charity and Contact.. Explanation: Setting Up a Charity Ambassador Connection Role Context: Connection roles in Dynamics 365 define named relationships between records. Here you're linking Contact records (ambassadors) to Charity records (custom table) via a role called "Charity Ambassador." --- Why T
Question
Exhibit
Answer Area
Drag items
Correct arrangement
- In PowerApps, select Solutions and open an unmanaged solution.
- Add a new connection role from the command bar.
- Describe the connection role and enter "Charity Ambassador" as the name.
- Select the checkbox for record types Charity and Contact.
Explanation
Explanation: Setting Up a Charity Ambassador Connection Role
Context: Connection roles in Dynamics 365 define named relationships between records. Here you're linking Contact records (ambassadors) to Charity records (custom table) via a role called "Charity Ambassador."
Why This Sequence
Step 1 - In PowerApps, select Solutions and open an unmanaged solution.
Reason: This is the correct modern entry point for creating connection roles. You must work inside an unmanaged solution because managed solutions are locked and cannot be modified. The legacy path (Advanced Settings > Administration) still exists but is the wrong answer here - it's a deliberate distractor testing whether you know the current recommended approach.
Common mistake: Choosing "Advanced Settings" first. That path is outdated for this task and won't give you the solution-aware connection role creation flow.
Step 2 - Add a new connection role from the command bar.
Reason: Once inside the unmanaged solution, you add a new component - specifically a Connection Role - using the command bar. You can't configure what doesn't exist yet, so creation comes before naming or configuration.
Common mistake: Trying to name or configure before the role object is created.
Step 3 - Describe the connection role and enter "Charity Ambassador" as the name.
Reason: Naming and describing the role is the first configuration step after the role is created. The name "Charity Ambassador" identifies the relationship's purpose. This must precede record-type selection because it defines what you're configuring.
Common mistake: Thinking record-type selection comes before naming. The UI flow is: create → name → associate record types.
Step 4 - Select the checkbox for record types Charity and Contact.
Reason: The scenario requires the connection to span both record types - Charity (source) and Contact (ambassador). Selecting both enables charity managers to link a charity to a contact using this role. Selecting only one would make the role unusable in the intended direction.
Common mistake: Selecting "Charity only" (the ambassador isn't linked) or "Contact only" (the charity isn't linked). Both are wrong because a connection role needs both participating record types declared.
Rejected Items - Why They're Wrong
| Item | Why Excluded |
|---|---|
| "From Dynamics 365, open Advanced Settings..." | Legacy navigation path; not the correct modern approach via PowerApps Solutions |
| "Select the checkbox for record type Charity only" | Incomplete - Contact must also be included |
| "Select the checkbox for record type Contact only" | Incomplete - Charity must also be included |
Key takeaway: The sequence follows a strict logical dependency - you must open the right environment → create the object → name it → configure it. Skipping or reordering any step breaks either the technical workflow or the solution packaging model.
Topics
Community Discussion
No community discussion yet for this question.