MB-230 · Question #353
Drag and Drop Question A company creates a single-page Power BI visualization to show how a Power Virtual Agents chatbot is performing. Users must be able to navigate to the charts from anywhere withi
The correct answer is Navigate to the maker portal and create a new solution.; Select Add Existing and then select Dashboard.; Select Power BI report for Type. Enter the Power BI workspace and Power BI report values.; Edit the sitemap, add a new subarea, and add the Power BI page information to the properties of the subarea.; Save and publish the customization.. Explanation: Embedding Power BI in Customer Service Workspace Scenario summary: You need to embed a Power BI report into the Customer Service workspace app so users can navigate to it from anywhere via the sitemap. The correct approach uses the Power Apps maker portal solution fr
Question
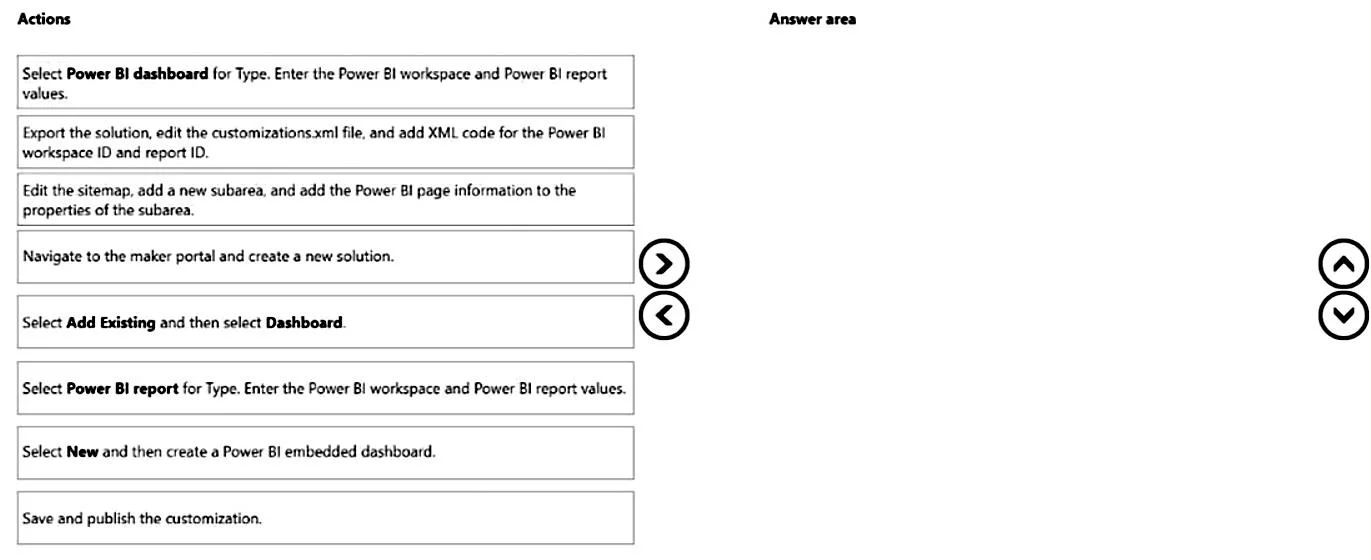
Drag and Drop Question A company creates a single-page Power BI visualization to show how a Power Virtual Agents chatbot is performing. Users must be able to navigate to the charts from anywhere within the Customer Service workspace. You need to add the Power BI information to the Customer Service workspace app. Which five actions should you perform in sequence? To answer, move the appropriate actions from the list of actions to the answer area and arrange them in the correct order. Answer:
Exhibit
Answer Area
Drag items
Correct arrangement
- Navigate to the maker portal and create a new solution.
- Select Add Existing and then select Dashboard.
- Select Power BI report for Type. Enter the Power BI workspace and Power BI report values.
- Edit the sitemap, add a new subarea, and add the Power BI page information to the properties of the subarea.
- Save and publish the customization.
Explanation
Explanation: Embedding Power BI in Customer Service Workspace
Scenario summary: You need to embed a Power BI report into the Customer Service workspace app so users can navigate to it from anywhere via the sitemap. The correct approach uses the Power Apps maker portal solution framework.
Why This Specific Order
The sequence follows the mandatory dependency chain: you must have a container (solution) → add a component (dashboard) → configure it → expose it in navigation (sitemap) → publish it.
Step-by-Step Breakdown
Step 1 - Navigate to the maker portal and create a new solution.
All customizations to model-driven apps (like Customer Service workspace) must be done inside a solution for proper Application Lifecycle Management (ALM). This is always the first step - without a solution context, you have no scoped place to add or configure app components. Skipping this and customizing directly risks unmanaged, untrackable changes.
Step 2 - Select Add Existing and then select Dashboard.
Inside the solution, you navigate to the Dashboards component area. Choosing Add Existing → Dashboard enters the dashboard management UI where you can configure a Power BI embedded dashboard. This is the gateway step that surfaces the configuration options used in Step 3.
Common mistake: Choosing "Select New and then create a Power BI embedded dashboard" (a distractor) sounds logical, but the correct workflow routes through "Add Existing → Dashboard" within a solution, not a standalone "New" creation flow.
Step 3 - Select Power BI report for Type. Enter the Power BI workspace and Power BI report values.
When configuring the embedded dashboard, you must choose the Type. The key distinction:
| Type | What it embeds |
|---|---|
| Power BI report | A Power BI Report (single or multi-page, interactive) |
| Power BI dashboard | A Power BI Dashboard (pinned-tiles summary page) |
The question describes a "single-page Power BI visualization" - this is a Power BI Report, so the correct Type is Power BI report, not "Power BI dashboard."
You then provide the Power BI workspace ID and report ID to link the specific report.
Common mistake: Selecting "Power BI dashboard for Type" (the distractor) - people conflate the general term "dashboard" with the Power BI-specific artifact type. They are different things.
Step 4 - Edit the sitemap, add a new subarea, and add the Power BI page information to the properties of the subarea.
Adding the dashboard to the solution only makes it exist - it doesn't make it navigable. To let users reach it from anywhere in the Customer Service workspace, you must add it to the sitemap as a subarea. The subarea's properties reference the Power BI dashboard component you configured in Steps 2–3. Without this step, users would have no navigation entry point to the report.
Step 5 - Save and publish the customization.
All model-driven app changes are staged until explicitly published. Publishing pushes the sitemap and dashboard changes live so end users see them. This must always be last - publishing before completing configuration would push an incomplete state.
Eliminated Distractors
| Distractor | Why it's wrong |
|---|---|
| Export solution / edit customizations.xml | This is a legacy XML-editing workaround for embedding Power BI. The modern maker portal UI (Steps 1–5) is the correct approach and doesn't require manual XML editing. |
| Select New and then create a Power BI embedded dashboard | Not the correct workflow path within a solution. |
| Select Power BI dashboard for Type | Wrong Power BI artifact type for the described scenario. |
Key Takeaway
The order is driven by dependency: solution → component → configuration → navigation → publish. Each step unlocks the next, and publishing is always the terminal action.
Topics
Community Discussion
No community discussion yet for this question.
