
Microsoft
MB-280 · Question #170
Case Study 3 - CRONUS International Ltd General overview CRONUS International Ltd. produces commercial printing supplies. Currently, CRONUS organizes its products under three (3) main printer…
Sign in or unlock MB-280 to reveal the answer and full explanation for question #170. The question stem and answer options stay visible for context.
Design and deploy personalized customer journeys
Question
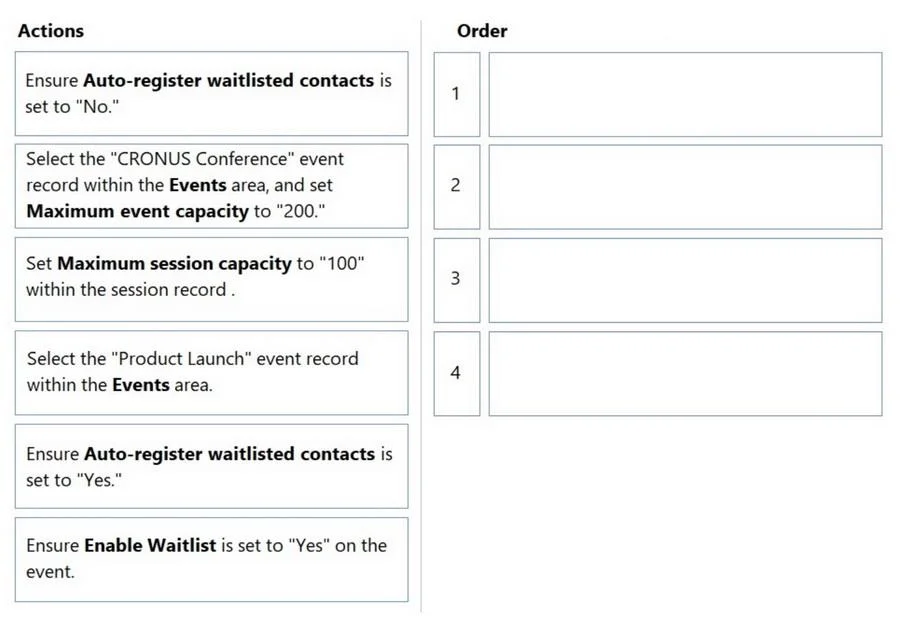
Case Study 3 - CRONUS International Ltd General overview CRONUS International Ltd. produces commercial printing supplies. Currently, CRONUS organizes its products under three (3) main printer brands. CRONUS engages in demand generation: - The marketing team captures and qualifies leads, then routes qualified leads to the sales teams. - The sales teams send their own follow-up communications to potential customers after a lead has been routed to them. Sales team members only have access to the Sales Hub app and are UNABLE to trigger Customer Insights - Journeys emails. Existing environment CRONUS has implemented Dynamics 365 Sales and Dynamics 365 Customer Insights - Journeys. The website for CRONUS is built on WordPress. A form created in Customer Insights - Journeys has been embedded on the website's "Contact Us" page. - The form is configured to create Lead records upon submission. - Submitting a "Contact Us" form initiates the creation of a Lead which is then reviewed by a marketing user. The Lead will either be disqualified or routed to the correct team using a business process flow. Currently, Customer Insights - Journeys is used to send weekly email newsletters to Contacts based on which of the three (3) printer brands the Contact's company has purchased most recently. CRONUS uses the default settings provisioned with the Customer Insights -Journeys application. Aside from domain authentication of the CRONUS web and email domain, no new settings have been created. New situation Upcoming conference CRONUS has an upcoming annual conference where they plan to launch a partnership with a fourth (4th) printer brand. The chief marketing officer's (CMO's) priority is to optimize the demand generation processes related to the conference. The launch strategy The CMO wants to achieve a strong return on investment (ROI) by attracting sponsors to the conference. CRONUS will hire celebrity speakers for the conference to increase interest overall and to boost the brand launch event. These speakers have previously been registered and configured in Customer Insights - Journeys. They will be booked and managed by Allure Bays Corp, a third-party supplier. The supplier has been added to Entra via guest access and have Dynamics 365 licenses. Implementation of the strategy Pre-conference awareness A teaser page will be published one (1) month prior to the conference to generate a list of interested Leads. Leads will be nurtured with pre-conference content and receive a registration launch announcement in email. If the Lead clicks on the "Learn More" link in the registration launch email, the link will take them to an event-specific portal, where they can sign-up for the conference as a whole, as well as various tracks and individual sessions - including the launch sessions. Existing Contacts will also receive the registration launch email and be able to sign up for sessions. Registration campaign stages If a Lead or Contact registers for one of the product launch sessions, they should NO longer receive additional invitations to register for product launch sessions. Any Leads and Contacts who do NOT click on the "Learn More" link should be sent an additional launch announcement email reminding them to the register. Registration routing Anyone registering for a product launch session should be directed to the sales team. - If the registrant has an existing account owner, the registrant should be routed to that account owner. The account owner will send them a "Contact Outreach" email using CRONUS branding. - If the registrant does NOT have an existing account owner, they should be routed to the inside sales team. The inside sales team will send them a "Lead Outreach" email using conference branding. Event management The event will be held in CRONUS's own "Presentation Building" with several usable rooms. The CMO indicated that the "Presentation Room" should be used for the product launch sessions, while the "Conference Room" can be used for other larger sessions. The CMO has several expectations for the event: 1. Accessibility- All rooms must be designed for accessibility. 2. Engagement - There are multiple formats available for the rooms. Specifically for the product launch sessions, the "Theater" format must be used to optimize engagement. 3. Attribution - It is necessary to be able to report on the Sponsorship amount achieved, as well as "New Opportunities," and ultimately "Opportunities Closed as Won," resulting from attendees of the product launch sessions. 4. Interest - The ROI for the product launch sessions must be optimized. Given that the room can only accommodate 100 guests and the event can only cater to 200 guests, the CMO wants to personally review which Contacts to add from high-value accounts if the room is close to capacity. New requirements Customer Insights - Journeys requirements The conference strategy requires the following in Customer Insights - Journeys: - Create new lead capture form for the pre-conference page, creating Leads on submission. - Create registration components. - Create conference event and session records, including the following where appropriate: - Sponsors - Speakers - Room layouts - Ensure registered Leads and Contacts are removed from the registration launch journey when they have registered for a product launch session. - Ensure Leads and Contacts are routed to the correct account owner or Inside sales team members. - Ensure account owners and inside sales team members have the correctly branded email templates to use in their one-to-one communication to Leads. Other requirements Since the launch is quickly approaching, the web team does NOT want to commit to developing new Word Press landing pages. - The new landing pages must be standalone pages hosted by Customer Insights - Journeys. - The default registration forms must be used. - The event portal must be a Power Pages portal. The portal must include the conference hero image, the conference logo, and a gallery of sessions guests can sign up for. Currently, most users of Customer Insights - Journeys have a standard "CRONUS Marketer" security role assigned. However, third-party suppliers are NOT allowed to have access to Contact data, so the IT team has created a new security role named "Event Configurator" that allows access to Event records but NOT to Contact data. Drag and Drop Question You need to set up the event records for the conference per the CMO's requirements for interest in the product launch sessions. Which four actions should you perform in sequence? To answer, move the four appropriate actions from the list of actions to the answer area. Arrange the four actions in the correct order. NOTE: More than one order of answer choices is correct. You will receive credit for any of the correct orders you select. Answer:
Exhibit
Answer Area
Drag items
Go to the Website and Form tab on the event record and select "Registration Form" as where you want attendees to register.Go to the event record and select the standalone registration page where you want attendees to register.Change to the Default registration form with sessions and enable Allow attendees to register for sessions.Go to the event record and select "Power Pages Website" as where you want attendees to register.In the Settings area in Customer Insights - Journeys, select Power Pages Websites and create a new configuration record with a name and the homepage URL.Create a new form using the Customer Insights - Journeys form editor and choose the Event Registration template.Create a new website in Power Pages and choose the Event Portal template. Then, configure the homepage with the conference hero image, logo, and card gallery component.
Unlock MB-280 to see the answer
You've previewed enough free MB-280 questions. Unlock MB-280 for full answers, explanations, the timed quiz mode, progress tracking, and the master PDF. Question stem and options stay visible so you can still see what's on the exam.
Topics
#event records#room capacity#waitlist management#product launch sessions