AZ-800 · Question #227
SIMULATION You need to monitor the security configuration of DC1 by using Microsoft Defender for Cloud. The required source files are located in a folder named \\dc1.contoso.com\install. To complete t
Sign in or unlock AZ-800 to reveal the answer and full explanation for question #227. The question stem and answer options stay visible for context.
Question
SIMULATION You need to monitor the security configuration of DC1 by using Microsoft Defender for Cloud. The required source files are located in a folder named \dc1.contoso.com\install. To complete this task, sign in the required computer or computers. Answer:
You can connect your non-Azure computers in any of the following ways:
- Onboarding with Azure Arc:
- By using Azure Arc-enabled servers (recommended)
-->By using the Azure portal
- Onboarding directly with Microsoft Defender for Endpoint
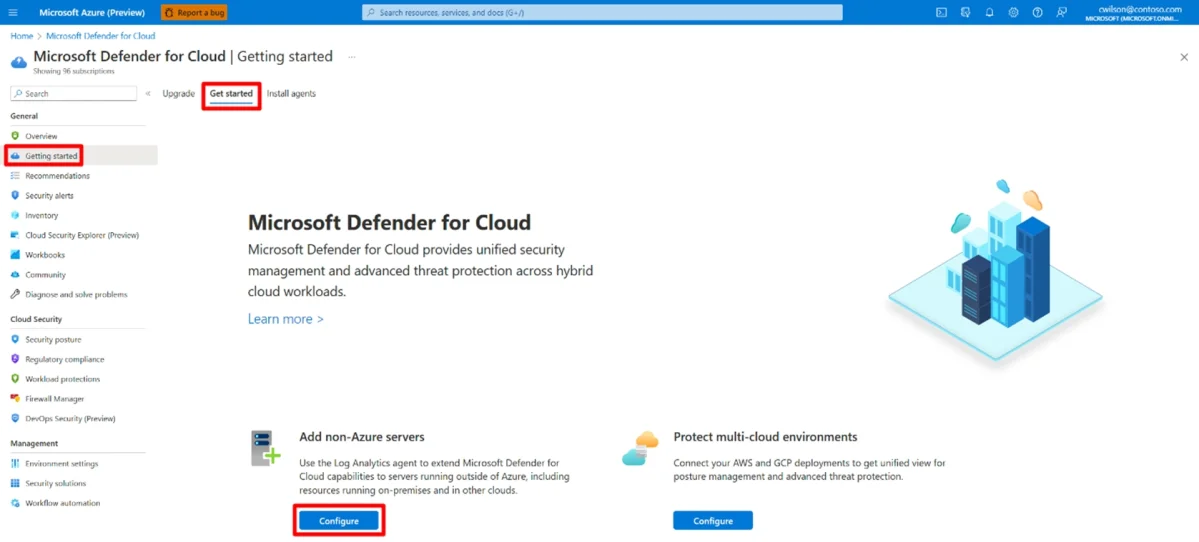
Connect on-premises machines by using the Azure portal After you connect Defender for Cloud to your Azure subscription, you can start connecting your on-premises machines from the Getting started page in Defender for Cloud. Step 1: Sign in to the Azure portal. Step 2: Search for and select Microsoft Defender for Cloud. Step 3: On the Defender for Cloud menu, select Getting started. Step 4: Select the Get started tab. Step 5: Find Add non-Azure servers and select Configure. A list of your Log Analytics workspaces appears. Step 6: (Optional) If you don't already have a Log Analytics workspace in which to store the data, select Create new workspace, and follow the on-screen guidance. Step 7: From the list of workspaces, select Upgrade for the relevant workspace to turn on Defender for Cloud paid plans for 30 free days. Step 8: From the list of workspaces, select Add Servers for the relevant workspace. On the Agents management page, choose one of the following procedures, depending on the type of machines you're onboarding (Either Windows or Linux) Onboard your Windows server When you add a Windows server, you need to get the information on the Agents management page and download the appropriate agent file (32 bit or 64 bit). To onboard a Windows server:
Step 1: Select Windows servers. Step 2: Select the Download Windows Agent link that's applicable to your computer processor type to download the setup file. Step 3: From the Agents management page, copy the Workspace ID and Primary Key values into Notepad. Step 4: Copy the downloaded setup file to the target computer and run it. Step 5: Follow the installation wizard (select Next > I Agree > Next > Next). Step 6: On the Azure Log Analytics page, paste the Workspace ID and Primary Key values that you copied into Notepad. Step 7: If the computer should report to a Log Analytics workspace in the Azure Government cloud, select Azure US Government from the Azure Cloud dropdown list. Step 8: If the computer needs to communicate through a proxy server to the Log Analytics service, select Advanced. Then provide the URL and port number of the proxy server. Step 9: When you finish entering all of the configuration settings, select Next. Step 10: On the Ready to Install page, review the settings to be applied and select Install. Step 11: On the Configuration completed successfully page, select Finish. When the process is complete, Microsoft Monitoring agent appears in Control Panel. You can review your configuration there and verify that the agent is connected. Reference:
https://learn.microsoft.com/en-us/azure/defender-for-cloud/quickstart-onboard-machines
Exhibit
Options
- ABy using Azure Arc-enabled servers (recommended)
- BBy using the Azure portal
- COnboarding directly with Microsoft Defender for Endpoint
Unlock AZ-800 to see the answer
You've previewed enough free AZ-800 questions. Unlock AZ-800 for full answers, explanations, the timed quiz mode, progress tracking, and the master PDF. Question stem and options stay visible so you can still see what's on the exam.