
200-401 · Question #53
Drag and Drop Question Answer:
The correct answer is Disconnect all cables and connectors from the front panel of the switch.; Turn off power to the switch.; Pull the bottom of the switch away from the DIN rail and lift the hooks off the top of the DIN rail.; Release the latch from the DIN rail using a flat head screw driver. DIN Rail Switch Removal - Step-by-Step Explanation This question covers the correct procedure for safely removing a switch mounted on a DIN rail, which is a standard metal mounting rail used in industrial and networking enclosures. --- Why This Order Matters The sequence…
Question
Drag and Drop Question Answer:
Exhibit
Answer Area
Drag items
Correct arrangement
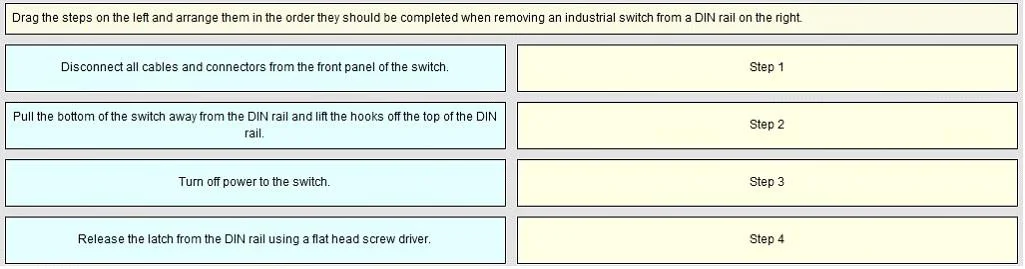
- Disconnect all cables and connectors from the front panel of the switch.
- Turn off power to the switch.
- Pull the bottom of the switch away from the DIN rail and lift the hooks off the top of the DIN rail.
- Release the latch from the DIN rail using a flat head screw driver.
Explanation
DIN Rail Switch Removal - Step-by-Step Explanation
This question covers the correct procedure for safely removing a switch mounted on a DIN rail, which is a standard metal mounting rail used in industrial and networking enclosures.
Why This Order Matters
The sequence follows a safe-then-physical logic: eliminate electrical and data risks before performing mechanical actions.
Step-by-Step Breakdown
Step 1: Disconnect all cables and connectors from the front panel
Cables are removed before powering off because:
- It prevents live cable ends from accidentally shorting against other equipment during removal
- It removes physical tension/strain from the switch before handling it
- Some connections (like fiber) must be capped immediately to avoid damage
Common mistake: Assuming you must power off first. In this procedure, safely removing cables while the device is still powered (and perhaps still passing traffic) is intentional - the network can gracefully fail over before the hard power cut.
Step 2: Turn off power to the switch
Only after cables are disconnected do you cut power. This:
- Eliminates shock risk during the mechanical removal steps
- Prevents arcing from live connectors during handling
- Ensures no residual data traffic is interrupted abruptly (cables already removed)
Common mistake: Powering off first. If you yank cables from a live, active switch, you risk sudden network disruption and potential hardware damage.
Step 3: Pull the bottom of the switch away from the DIN rail and lift the hooks off the top
Now that it's safe (no cables, no power), you begin physical removal by:
- Pulling the bottom outward - this disengages the lower clip
- Then lifting upward - this slides the top hooks off the rail
Common mistake: Trying to lift straight up. DIN rail mounts use a hook-and-latch system; you must swing the bottom out first, then lift.
Step 4: Release the latch from the DIN rail using a flat head screwdriver
Note: This step ordering may seem counterintuitive. In most DIN rail removal procedures, you would release the latch before pulling the device away (the latch physically locks the bottom). The likely intent here is that the screwdriver is used to fully disengage or detach the latch mechanism from the rail as a final step - either to free a stuck clip or to separate the mounting hardware entirely.
Common mistake: Using the wrong tool (fingers instead of a screwdriver) - the latch spring is often stiff enough to require a tool, and forcing it by hand risks injury or damaging the clip.
Summary Table
| Step | Action | Why |
|---|---|---|
| 1 | Disconnect cables | Remove physical/data risk first |
| 2 | Power off | Eliminate electrical hazard before handling |
| 3 | Pull bottom away, lift off rail | Correct DIN rail release motion |
| 4 | Release latch with screwdriver | Final mechanical disengagement |
Topics
Community Discussion
No community discussion yet for this question.