
200-301 · Question #1595
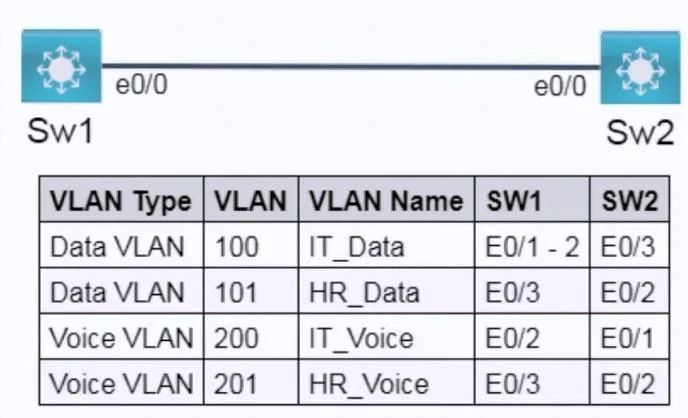
Lab Simulation 39 Guidelines This is a lab item in which tasks will be performed on virtual devices. - Refer to the Tasks tab to view the tasks for this lab item. - Refer to the Topology tab to…
Lab Simulation 39 - Explanation Overall Goal You are configuring two Cisco switches (Sw1 and Sw2) to support voice and data on the same physical ports using VLANs. The three tasks achieve network segmentation, proper port behavior, and security by silencing neighbor discovery…
Question
Exhibits
Explanation
Lab Simulation 39 - Explanation
Overall Goal
You are configuring two Cisco switches (Sw1 and Sw2) to support voice and data on the same physical ports using VLANs. The three tasks achieve network segmentation, proper port behavior, and security by silencing neighbor discovery protocols.
Why This Approach Is Correct
Modern IP phones plug into a switch port, and a PC plugs into the back of the phone. The switch needs to:
- Send data traffic on one VLAN (untagged, for the PC)
- Send voice traffic on a separate VLAN (tagged, for the phone)
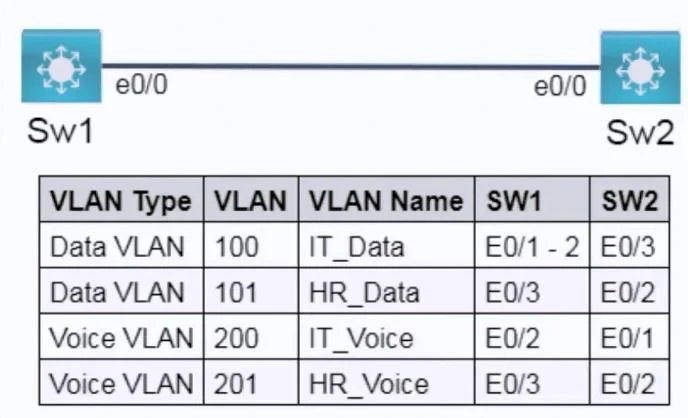
However, this lab uses access mode ports (not voice VLAN mode), meaning each port carries exactly one VLAN. The topology table tells you which VLAN each port belongs to - you simply follow the map.
Step 1: Create and Name VLANs
Sw1(config)# vlan 100
Sw1(config-vlan)# name IT_Data
Why necessary: VLANs don't exist on a switch until you create them. Assigning a port to a nonexistent VLAN will result in the port being inactive or in an error state. Naming VLANs (IT_Data, HR_Data, IT_Voice, HR_Voice) is required by the task and makes administration unambiguous.
Both switches need the same VLANs because if traffic crosses an uplink between Sw1 and Sw2, the receiving switch must recognize the VLAN ID - otherwise frames are dropped.
If skipped: Ports assigned to undefined VLANs go into an inactive state. Traffic drops silently.
Step 2: Assign VLANs to Interfaces in Access Mode
Sw1(config-if)# switchport mode access
Sw1(config-if)# switchport access vlan 100
Why switchport mode access: This forces the port into non-trunking, non-negotiating mode. Without it, the port may try to auto-negotiate a trunk (DTP), which would carry all VLANs - a security risk and not what's required.
Why switchport access vlan <id>: This binds the port to exactly one VLAN. Untagged frames entering or leaving this port belong to that VLAN only.
If done out of order (VLAN assigned before created): The assignment technically sticks in config, but the port may show as inactive until the VLAN is created. Always create VLANs first.
If only one command is used: Omitting switchport mode access leaves the port in dynamic mode - it might trunk to a connected device, violating the "non-trunking, single-VLAN" requirement.
Step 3: Disable Neighbor Discovery Protocol (CDP/LLDP)
Sw1(config-if)# no cdp enable
Sw1(config-if)# no lldp transmit
Sw1(config-if)# no lldp receive
Why necessary: CDP (Cisco Discovery Protocol) and LLDP (Link Layer Discovery Protocol) advertise device information (hostname, IP, model, software version) to directly connected neighbors. On access ports facing end devices (PCs, phones), this is a security exposure - an attacker can learn the network topology.
What it accomplishes: The interface stops sending and receiving neighbor discovery frames. End devices never learn switch details.
If skipped: The port still functions, but it leaks infrastructure information to connected devices - a compliance failure and a potential attack vector.
Saving to NVRAM
Sw1# copy running-config startup-config
Always required before moving on. IOS config lives in RAM - a reload wipes it without this step.
Memory Tips
| Task | Mnemonic |
|---|---|
| Create VLANs before assigning | "You can't move into a house that doesn't exist" |
| Access mode = one VLAN, no trunk | "Access = single door, trunk = highway" |
| Disable CDP/LLDP on edge ports | "Don't gossip to strangers" |
| Save to NVRAM last | "Commit before you quit" |
Common Exam Traps
- Forgetting
switchport mode access- the port silently stays in dynamic mode. - Configuring VLANs on only one switch - inter-switch traffic drops if the peer doesn't know the VLAN.
- Disabling CDP globally (
no cdp run) instead of per-interface - this breaks CDP to routers and other switches where it's needed for management.
Topics
Community Discussion
No community discussion yet for this question.