
200-301 · Question #1554
Lab Simulation 35 Guidelines This is a lab item in which tasks will be performed on virtual devices. - Refer to the Tasks tab to view the tasks for this lab item. - Refer to the Topology lab to…
This lab simulation requires configuring OSPF on Router R1, setting a specific process ID and router ID, activating OSPF on its connected interfaces in Area 0 without using network statements, and ensuring R1 always becomes the Designated Router.
Question
Exhibits
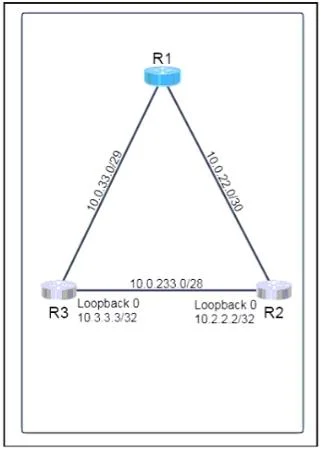
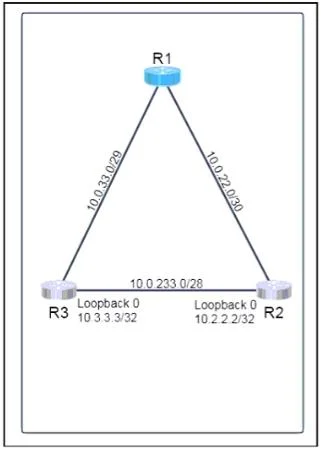
Explanation
This lab simulation requires configuring OSPF on Router R1, setting a specific process ID and router ID, activating OSPF on its connected interfaces in Area 0 without using network statements, and ensuring R1 always becomes the Designated Router.
Approach. The correct interaction involves typing a sequence of Cisco IOS commands into the R1 console to meet the specified tasks. The IP addresses for e0/1 and e0/2 are provided in the partial answer snippet and should be considered configured. The interface e0/0 line in the snippet is a red herring and should be ignored or overwritten, as R1 does not have such an interface connected in the relevant OSPF topology.
Here's the sequence of commands to accomplish the tasks:
-
Enter global configuration mode:
configure terminal -
Configure the OSPF process and Router ID (Task 1):
router ospf 33router-id 10.0.22.1(E0/1's IP is 10.0.22.1)exit -
Configure OSPF on interfaces e0/1 and e0/2, activate in Area 0 without network statements, and set DR priority (Tasks 2 & 3):
interface e0/1ip ospf 33 area 0(Activates OSPF on the interface in Area 0, satisfying 'no network statements' requirement)ip ospf priority 255(Ensures R1 becomes DR, as 255 is the highest priority)exitinterface e0/2ip ospf 33 area 0ip ospf priority 255exit -
Exit configuration mode and save:
endwrite memoryorcopy running-config startup-config
This sequence correctly sets the OSPF process ID to 33, explicitly assigns the router ID as the E0/1 IP, includes both connected interfaces (e0/1 and e0/2) in OSPF Area 0 using interface-level commands, and ensures R1 has the highest OSPF priority (255) on both segments to always become the Designated Router, assuming the default OSPF network type (broadcast) applies, which supports DR/BDR election.
Common mistakes.
- common_mistake. Common mistakes include using
networkstatements under the OSPF process, which is explicitly forbidden by Task 2. Failing to configureip ospf priority 255on interfaces e0/1 and e0/2 would mean R1 might not become the DR (default priority is 1), failing Task 3. Using an incorrect OSPF process ID or Area ID (other than 33 and 0, respectively) would prevent proper adjacency formation. Not activating OSPF on both relevant interfaces (e0/1 and e0/2) or trying to configureinterface e0/0(a red herring based on the topology) would lead to incomplete or incorrect OSPF setup. Another mistake is setting the OSPF network type to 'point-to-point' on the interfaces, as this would disable DR/BDR election, contradicting the requirement for R1 to always be the DR.
Concept tested. OSPF (Open Shortest Path First) configuration fundamentals, including process ID, router ID, interface-level OSPF activation (ip ospf area), and OSPF Designated Router (DR) election mechanics using ip ospf priority on multi-access (or broadcast by default) segments. It also tests the ability to interpret network topologies and follow specific constraints (e.g., 'no network statements').
Reference. null
Topics
Community Discussion
No community discussion yet for this question.