Microsoft
AZ-800 · Question #218
AZ-800 Question #218: Real Exam Question with Answer & Explanation
Sign in or unlock AZ-800 to reveal the answer and full explanation for question #218. The question stem and answer options stay visible for context.
Implement and manage on-premises and hybrid networking infrastructure
Question
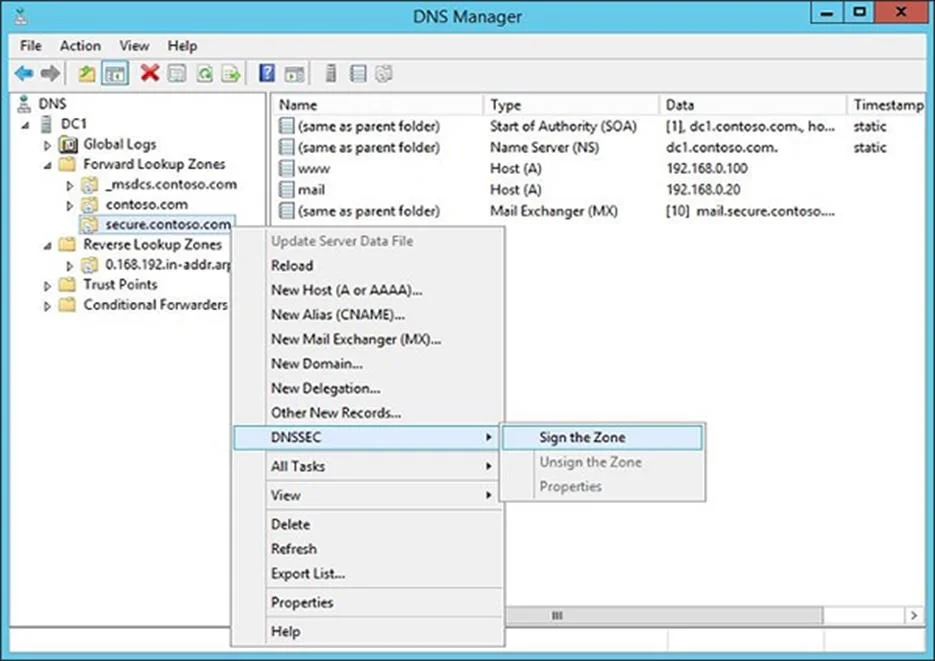
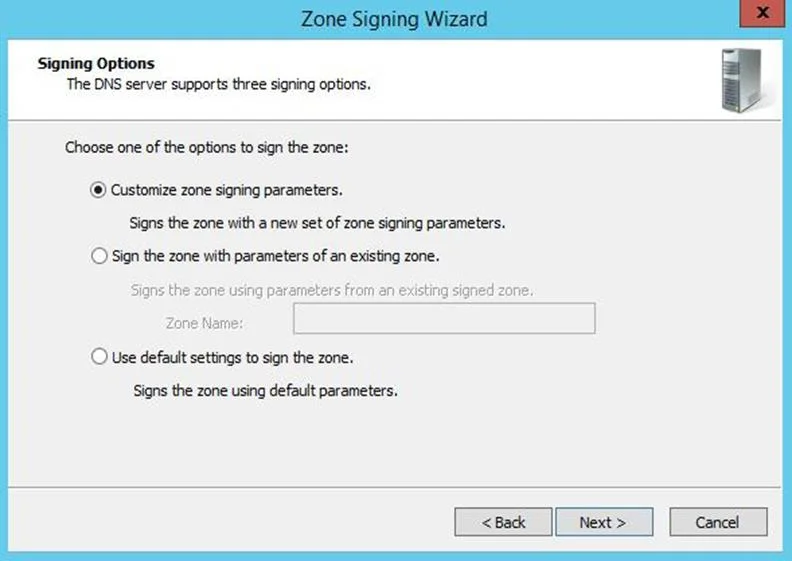
SIMULATION You need to deploy a new primary DNS zone named fabrikam.com to DC1. The zone must be signed. To complete this task, sign in to the required computer or computers. Answer: Step 1: Create the zone Manage DNS zones using DNS server in Windows Server Create a primary zone Create an Active Directory integrated primary zone To create an Active Directory integrated primary zone, select the relevant method and follow the steps. Here's how to create a forward look up zone using DNS Manager. 1. From the Windows desktop, open the Start menu, select Windows Administrative Tools > DNS. 2. In the console tree, connect to the DNS server you wish to manage, expand the DNS server, right-click, then select New Zone. Connect to: DC1 3. On the New Zone Wizard page, select Next. 4. On the Zone Type page, select Primary zone and ensure Store the zone in Active Directory is checked. This option is available when the DNS server is also an AD DS domain controller. 5. On the Active Directory Zone Replication Scope page, choose one of the following options: All DNS servers running on AD DS domain in the domain. All domain controllers in this domain (for Windows 2000 compatibility). All domain controllers enrolled in a specific directory partition. 6. On the Forward or Reverse Lookup Zone page, select Forward lookup zone. 7. On the zone name page, specify the name of the DNS zone. For example, north.contoso.com Type: fabrikam.com 8. On the Dynamic Update page, choose one of the following options: Allow only secure dynamic updates (recommended for Active Directory). Allow both nonsecure and secure dynamic updates. Do not allow dynamic updates. 9. Select Finish to complete the New Zone Wizard. Step 2: Sign the zone Zone Signing Wizard To start the Zone Signing Wizard in DNS Manager, right-click a forward or reverse DNS zone on a primary, authoritative DNS server, point to DNSSEC, and click Sign the Zone. See the following example. After you click Sign the Zone, the wizard displays an introductory page with a summary of DNSSEC (not shown). Click Next to view the Signing Options page. Signing options The Signing Options page requires you to choose a method for specifying DNSSEC parameter values. See the following example. Select: Use default settings to sign the zone. If you choose this option, the zone will be signed with default parameters. These parameters are the same as those that are displayed by default if you choose to customize zone signing parameters, provided the zone has not been previously signed with a different set of parameters. If you choose to sign the zone with default settings, the wizard will skip to the summary page. Reference: https://learn.microsoft.com/en-us/windows-server/networking/dns/manage-dns-zones https://learn.microsoft.com/en-us/previous-versions/windows/it-pro/windows-server-2012-r2-and- 2012/dn593642(v=ws.11)
Exhibits
Options
- ACreate the zone
- BSign the zone
Unlock AZ-800 to see the answer
You've previewed enough free AZ-800 questions. Unlock AZ-800 for full answers, explanations, the timed quiz mode, progress tracking, and the master PDF. Question stem and options stay visible so you can still see what's on the exam.
Topics
#DNS Zone Management#DNSSEC#Active Directory DNS