
DP-300 · Question #402
SIMULATION You need to ensure that when non-administrative users query the SalesLT.Customer table in db1, email addresses are obscured. For example, an email address of [email protected] must appear…
Azure SQL Dynamic Data Masking - Exam Explanation Overall Goal The objective is to protect sensitive data (email addresses) from non-privileged users without changing the underlying data or application code. Dynamic Data Masking (DDM) is the correct tool because it applies…
Question
Exhibit
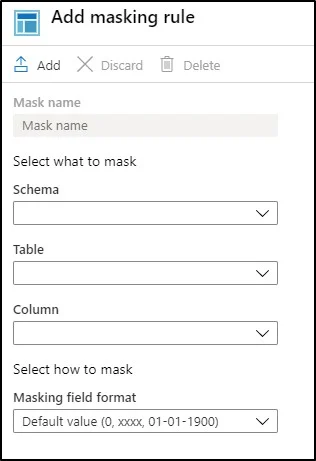
Explanation
Azure SQL Dynamic Data Masking - Exam Explanation
Overall Goal
The objective is to protect sensitive data (email addresses) from non-privileged users without changing the underlying data or application code. Dynamic Data Masking (DDM) is the correct tool because it applies masking at the query result layer - the actual data in the database is unchanged, but non-administrative users see a masked version. Admins and excluded identities still see real data.
This is a declarative policy approach, not encryption - it's lightweight, reversible, and requires no schema changes.
Step-by-Step Reasoning
Step 1 - Launch the Azure portal DDM for Azure SQL Database is managed through the Azure portal (or T-SQL/PowerShell). SSMS alone cannot configure DDM policies - it's a platform-level security feature, not a database object.
Step 2 - Navigate to db1
You must scope to the correct database resource. DDM policies are per-database, not per-server. Choosing the wrong database means the mask is never applied to SalesLT.Customer.
Step 3 - Open the Dynamic Data Masking pane (under Security) This is where the DDM policy lives. Skipping this and trying to configure masking elsewhere (e.g., SSMS object properties) won't work - DDM is not exposed there.
Step 4 - Use recommendations (if available)
Azure's recommendations engine scans column names and data patterns to suggest likely sensitive columns. If EmailAddress appears, accepting the recommendation creates the rule automatically with the correct default mask type. Skipping this when the recommendation is present wastes time but doesn't break anything - you'll just do it manually in the next step.
Step 5 - Manually click "Add Mask" at the top (if no recommendation) If the engine didn't surface the column (possible if naming is non-standard), you must create the rule manually. This opens the Add Masking Rule configuration pane.
Step 6 - Select Schema, Table, and Column
You must be precise: Schema = SalesLT, Table = Customer, Column = EmailAddress (the actual column name). A wrong column means the mask applies to the wrong data - the email column remains unmasked.
Step 7 - Select the "Email" masking function Azure SQL offers several masking formats:
| Format | Example |
|---|---|
| Default | XXXX (full mask) |
[email protected] | |
| Custom string | Configurable prefix/suffix/padding |
| Random number | Numeric columns |
You must choose Email - it's the only built-in format that produces the [email protected] pattern required by the spec. Choosing "Default" would obscure the entire value, not match the required format.
Step 8 - Save Without saving, no policy is written. The mask does not take effect. This is the most commonly missed step in simulations.
Step 9 (Skipped) - Exclusions
You can whitelist specific users/identities (e.g., DBAs) who should see real data. The question says skip this - by default, only db_owner and server admins bypass masking automatically.
What Breaks If Steps Are Skipped or Misordered
| Skipped Step | Consequence |
|---|---|
| Step 2 (wrong database) | Mask applied to wrong DB; db1 remains unprotected |
| Step 6 (wrong column) | Wrong column masked; email column still visible |
| Step 7 (wrong mask type) | Output format won't match [email protected] requirement |
| Step 8 (no Save) | Configuration lost; masking never activates |
Memory Tip
"Portal -> DB -> Security -> DDM -> Schema.Table.Column -> Email format -> Save"
Think of it as a funnel: you start broad (portal) -> narrow to the database -> narrow to the security feature -> narrow to the exact column -> choose how to hide it -> commit.
A secondary anchor: DDM is non-destructive and transparent - real data is untouched, only query results are masked. If you're ever unsure whether DDM or Transparent Data Encryption (TDE) is the right answer, remember: TDE protects data at rest (disk), DDM protects data at query time (what users see). This question requires the latter.
Topics
Community Discussion
No community discussion yet for this question.